Freefly Astro
Warning
BEFORE YOU TAKE OFF THE ASTRO, ENSURE THE FOLLOWING SETTINGS ARE CORRECT.
EKF2_EKF2_HGT_MODE = Range sensor
EKF2_RNG_AID = Range aid enabled
COM_OBL_ACT = Hold mode
COM_OBL_RC_ACT = Position mode
COM_QC_ACT = Hold mode
NAV_RCL_ACT = Land mode
COM_LOW_BAT_ACT = Warning
RTL_RETURN_ALT = 2.5 M
RTL_DESCEND_ALT = 2.5 M
IP Reservations
| Device Name | Username | IP Address | Password |
|---|---|---|---|
astro1 |
192.168.1.121 |
||
astro2 |
192.168.1.122 |
||
astro3 |
192.168.1.123 |
Status Codes
| Value | Field Name | Description |
|---|---|---|
| 0 | MAV_STATE_UNINIT |
Uninitialized system, state is unknown. |
| 1 | MAV_STATE_BOOT |
System is booting up. |
| 2 | MAV_STATE_CALIBRATING |
System is calibrating and not flight-ready. |
| 3 | MAV_STATE_STANDBY |
System is grounded and on standby. It can be launched any time. |
| 4 | MAV_STATE_ACTIVE |
System is active and might be already airborne. Motors are engaged. |
| 5 | MAV_STATE_CRITICAL |
System is in a non-normal flight mode (failsafe). It can however still navigate. |
| 6 | MAV_STATE_EMERGENCY |
System is in a non-normal flight mode (failsafe). It lost control over parts or the whole airframe. It is in mayday and going down. |
| 7 | MAV_STATE_POWEROFF |
System just initialized its power-down sequence, will shut down now. |
| 8 | MAV_STATE_FLIGHT_TERMINATION |
System is terminating itself (failsafe or commanded). |
Manual
Mavros Installation
-
Install the Auterion CLI. (Also see the :material-open-in-new: Auterion CLI Reference)
pip3 install auterion-cli -
Make sure the Astro is connected to WiFi or USB-C and run
auterion-cli device discover. The Astro should show up in the list with a serial and IP address. Example output:$ auterion-cli device discover Found devices selected serial version addresses ---------- --------- --------- ----------------- 131502818 v3.5.8 {'192.168.1.121'} Note: Use 'device select' command to select a device to interact with Use 'device deselect' command to reset selection -
To connect
auterion-clito the Astro, runauterion-cli device select [serial]. Example:$ auterion-cli device select 131502818 Selected device with ID 131502818 on address 192.168.1.121 -
Clone and build the
astro_mavrospackage from GitLab:git clone [https://[email protected]/autonomy-park-air-team/astro_mavros.git](https://[email protected]/autonomy-park-air-team/astro_mavros.git) cd astro_mavros && auterion-cli app build -
Install the
astro_mavrosbuild to the selected Astro:You should see output indicating the install was successful:auterion-cli app install build/com.autonomy.astro_mavros.auterionosInstalling artifact build/com.autonomy.astro_mavros.auterionos Looking for the update artifact Check if your device is online... API: v2.2 Uploading artifact: 246Mit [00:19, 12.9Mit/s] Waiting for the device to complete the installation The device has been updated successfully -
Now, navigate to the Astro's IP in a web browser and go to the Apps section.
Example URL
For Astro 1, the URL would be
http://192.168.1.121/apps -
The
astro_mavrosapplication should now be listed. Click the gear icon and select Settings.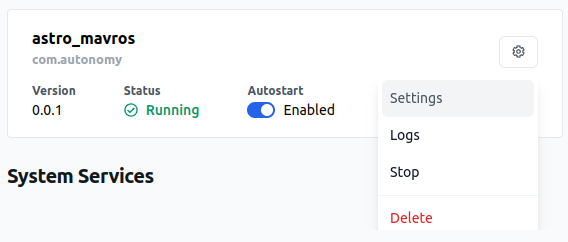
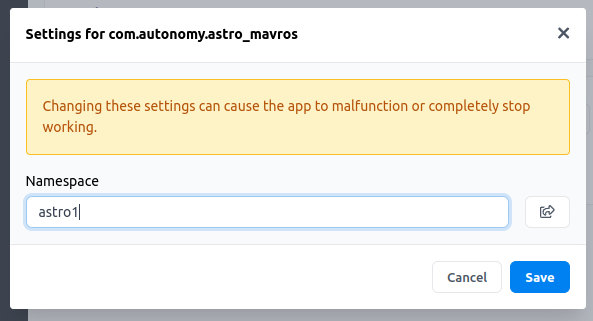
-
Set the namespace for the Mavros ROS2 node corresponding to the current Astro.
-
Finally, restart the
astro_mavrosapp by clicking Stop and then Start in the gear icon menu. You should now see namespaced Astro topics when you runros2 topic list:$ ros2 topic list /astro1/actuator_control /astro1/adsb/send /astro1/adsb/vehicle /astro1/altitude /astro1/battery /astro1/cam_imu_sync/cam_imu_stamp /astro1/camera/image_captured ... -
Verify that messages are being published by echoing an active topic:
Example output:ros2 topic echo /astro1/batteryheader: stamp: sec: 1728658560 nanosec: 149730930 frame_id: '' voltage: 22.83100128173828 temperature: 0.0 current: -0.3400000035762787 charge: .nan capacity: .nan design_capacity: .nan percentage: 0.5799999833106995 power_supply_status: 2 power_supply_health: 0 power_supply_technology: 3 present: true cell_voltage: - 3.81000018119812 - 3.81000018119812 - 3.808000087738037 - 3.8030002117156982 - 3.8010001182556152 - 3.7990002632141113 cell_temperature: [] location: id0 serial_number: ''